
 |
|
|||||||
| Creative Expression Post your own works and chat about them |
 |
|
|
Thread Tools | Display Modes |
|
|
#256 |
|
I think this line's mostly filler.
Join Date: Jan 2003
Location: DC
Posts: 13,575
|
It's hard to see in the picture, due to the color I used, but there will be a ledge all the way around the rails, so the bed will be supported all the way around, in addition to the cross support in the middle.
That ledge will be on top of the ash, so the mattress doesn't rest directly on the part you've seen so far. Code:
..MMMMMM
CCMMMMMM   M = Mattress
CRMMMMMM   C = Corner (the part I've been making)
CRMMMMMM   R = Rail, including ledge
CRMMMMMM   F = Foot
CRRR
CCCCCCCC
.....F
.....F
__________________
_________________ |...............| We live in the nick of times. | Len 17, Wid 3 | |_______________| [pics] Last edited by Happy Monkey; 01-07-2008 at 01:40 PM. |
|
|

|
|
|
#257 |
|
™
Join Date: Jul 2003
Location: Arlington, VA
Posts: 27,717
|
Cool. Can't wait to see more.
|
|
|

|
|
|
#258 |
|
I think this line's mostly filler.
Join Date: Jan 2003
Location: DC
Posts: 13,575
|
Bleh. Had an annoying weekend. Enamored with our new toy (the router table), we got cute with the joint attaching those bottom right Rs. As a result, we ended up messing the rails up further (in addition to cutting two of them too short, as mentioned above). The required repairs for that damage mean that we actually moved backwards over the weekend.
I was bummed for a few hours after that.
__________________
_________________ |...............| We live in the nick of times. | Len 17, Wid 3 | |_______________| [pics] |
|
|

|
|
|
#260 |
|
The future is unwritten
Join Date: Oct 2002
Posts: 71,105
|
The learning curve is actually a sine wave. The highs and lows will even out, and you'll end up with a beautiful bed.
__________________
The descent of man ~ Nixon, Friedman, Reagan, Trump. |
|
|

|
|
|
#261 |
|
I think this line's mostly filler.
Join Date: Jan 2003
Location: DC
Posts: 13,575
|
How right you are. Last weekend went very well. But before I get to that, I'll try to catch up. I've been lazy uploading for a while now.
We made the tops of the corners. Starting with a bit of narrow walnut, we made it a bit narrower with the tablesaw.  My dad got this miter saw for picture frames, and it works great for this, too.  I got him these clamps for picture frames years ago, and they've come in very handy.  The joint looks good.  Clamp and glue the top on. Lots of glue joints in this piece; no way around it, given the look I'm going for.  The corner with the top, outside and inside.  
__________________
_________________ |...............| We live in the nick of times. | Len 17, Wid 3 | |_______________| [pics] |
|
|

|
|
|
#262 |
|
I think this line's mostly filler.
Join Date: Jan 2003
Location: DC
Posts: 13,575
|
Now for the sliding dovetails. The feet will be made of two boards attached at a right angle in sliding dovetails on the bottom of the corners. The point of that right angle has to cross the line of the diagonal between the two points at which the rails exit the corner.
 The router table makes sliding dovetails possible (OK, feasible). We prepare for the dovetail bit with a straight bit. One with a screw shape may have been better, as the groove left by the bit was hard-packed with sawdust that was difficult to get out, even with a screwdriver. The clamp on the router table fence is an easy way to stop it at the right point.  We moved the clamp to the other side, and cut in the other direction.  We then ran the dovetail bit through the same path.   We ran the dovetail bit along each side of one end of each foot board as well, and voila! 
__________________
_________________ |...............| We live in the nick of times. | Len 17, Wid 3 | |_______________| [pics] |
|
|

|
|
|
#263 |
|
I think this line's mostly filler.
Join Date: Jan 2003
Location: DC
Posts: 13,575
|
OK, I'll try to get more caught up.
The two halves of each foot connect with a lock miter, another product of the router table.  I raised the template block on a shim so the bit was centered on the thickness of wood I was using. I'm not 100% certain that that was the best way to do it, but it worked. If I try it again on a more visible joint, I may have to do more experimentation. Additionally, the bit was too wide for the table insert we had. Maneuvering without an insert was tricky. We have since gotten more inserts.  One piece must be cut horizontal:  And the other vertical. This one was trickier. We clamped a strip of wood to the board, and ran that strip along the top of the fence, to keep from falling into the hole left by the lack of an insert.  All the boards laid flat:  And put together. They haven't been cut to final length yet. 
__________________
_________________ |...............| We live in the nick of times. | Len 17, Wid 3 | |_______________| [pics] |
|
|

|
|
|
#264 |
|
I think this line's mostly filler.
Join Date: Jan 2003
Location: DC
Posts: 13,575
|
Due to the way we did the lap joint, the bottom pieces were not all of a uniform length in each direction. A quick cut against the fence on the tablesaw fixed that.
 Check out the fit of the feet, and how much extra wood we have on the long board, and how short the short one is.  At long last, it's time to glue he bottom into the sides.  We need a walnut facade on the outer edge of the bottom, as that part will be slightly visible. We cut a notch into the end of a narrow board, and then cut off three and a half inches.  The facade is clamped in place, and a hole is drilled for a dowel. Endgrain isn't good for gluing, so a dowel is needed. A single dowel should be sufficient, as this should not bear any load.  Glue on the facade and hammer in the dowel.  Cut off the excess dowel, and plane the joint smooth. We used the tablesaw for this one, but that was too much of a hassle, so my dad planed the rest of them.  
__________________
_________________ |...............| We live in the nick of times. | Len 17, Wid 3 | |_______________| [pics] |
|
|

|
|
|
#265 |
|
I think this line's mostly filler.
Join Date: Jan 2003
Location: DC
Posts: 13,575
|
I made a jig to cut all of the feet to a uniform height. The dovetailed end of the board goes up against the block. With boards this short, this is much safer and easier than a fence.
  All the same height now. One is too short. I'll fix that later. 
__________________
_________________ |...............| We live in the nick of times. | Len 17, Wid 3 | |_______________| [pics] |
|
|

|
|
|
#266 |
|
I think this line's mostly filler.
Join Date: Jan 2003
Location: DC
Posts: 13,575
|
To give the illusion that each corner is a single block of wood, and to avoid nighttime skinned shin injuries, the edges are rounded over, using a half-inch roundover bit.
The roundover bit has a guide on it, so you don't need the fence. However, to reduce chatter when first contacting the bit, there is a post screwed into the router table surface. Holding the piece up against that post when contacting the bit makes it easier to maintain control while waiting to contact the guide. I did the outside edges first, so the bit would run along the curved surface when doing the top and bottom.  I then did the bottom, and finally the top.   I was originally going to round over that corner, but my parents convinced me not to, to add a point of contrast.
__________________
_________________ |...............| We live in the nick of times. | Len 17, Wid 3 | |_______________| [pics] |
|
|

|
|
|
#267 |
|
I think this line's mostly filler.
Join Date: Jan 2003
Location: DC
Posts: 13,575
|
Time to finish up the corners, by attaching the feet!
After a bit of sanding, to make the sliding dovetails easier to adjust during gluing, I slid them in place, and added glue to the lock miter joint, taking care to get it in all the nooks and crannies.  I (earlier, not pictured) cut off the excess wood from the long feet, and kept one of those pieces to fix the short one, shown here. The extra piece even came pre-dovetailed! Better safe than sorry- I also added a glue block to the inside of the joint.  And, speaking of better safe than sorry, I added a bit of hardware to the rails. 
__________________
_________________ |...............| We live in the nick of times. | Len 17, Wid 3 | |_______________| [pics] |
|
|

|
|
|
#268 |
|
I think this line's mostly filler.
Join Date: Jan 2003
Location: DC
Posts: 13,575
|
And speaking of the rails, it is time to attach them together. To allow them to be taken apart, they are attached with bolts and cross-dowels.
To help make the bolt holes straight, the initial hole is drilled with the drill press (Sorry for the psychedelics, my camera was set to nighttime mode). In this picture, you can also see the solutions for the two major mistakes made on the project. The board is capped to make up for cutting it too short, and you can see the wood strip filling the groove we messed up on.  We held the rails in position with a square on the bottom, and a framing clamp on top.  With the boards held in position, and the first part of the hole predrilled, going the rest of the way wasn't too difficult. Out of eight holes, only one got appreciably off course.  We then took it apart, and drilled the last bit. 
__________________
_________________ |...............| We live in the nick of times. | Len 17, Wid 3 | |_______________| [pics] |
|
|

|
|
|
#269 |
|
I think this line's mostly filler.
Join Date: Jan 2003
Location: DC
Posts: 13,575
|
I used a square to mark where I hoped the bolt had gone, and drilled down on that line with a bigger bit. For the one that got off course, I had to do this a second time to enlarge that hole.
 After the holes are drilled, and the correction made, it goes together.  The bolt heads stick out a bit. The rails have to fit snug in the corners, so the bolts need to be countersunk. 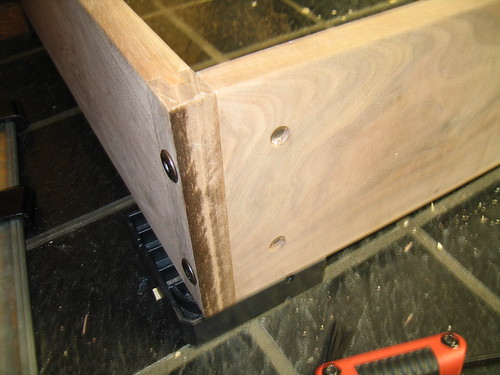 Initial holes are cut with a forstner bit.  The bit wasn't quite big enough, so it was finished with a chisel. 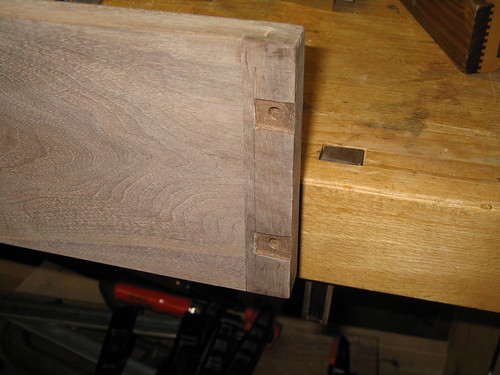
__________________
_________________ |...............| We live in the nick of times. | Len 17, Wid 3 | |_______________| [pics] |
|
|

|
|
|
#270 |
|
I think this line's mostly filler.
Join Date: Jan 2003
Location: DC
Posts: 13,575
|
Time for staining! My dad made a picture frame with an interesting color that I liked- walnut with an ebony stain.
Initially, it is very black. 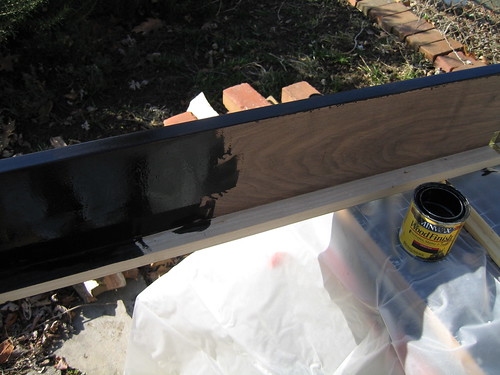 After letting it soak, we rubbed off the excess with a rag.  The walnut is more visible through the stain as it dries.  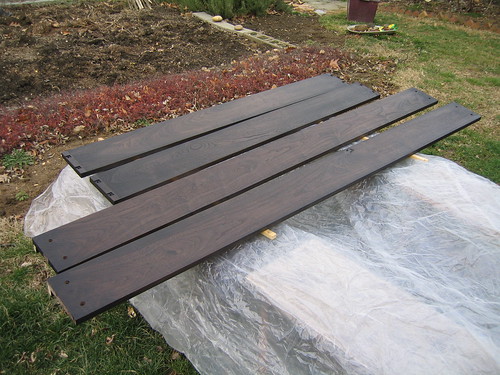 The corners get the same treatment.  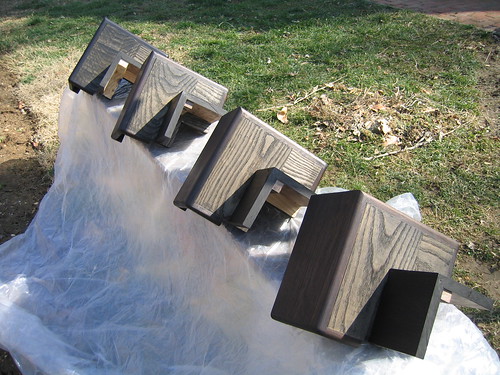
__________________
_________________ |...............| We live in the nick of times. | Len 17, Wid 3 | |_______________| [pics] |
|
|

|
 |
| Currently Active Users Viewing This Thread: 1 (0 members and 1 guests) | |
| Thread Tools | |
| Display Modes | |
|
|